Sacred
- Sacred: 실험의 설정, 조직화, 로그, 재생성을 도와주는 도구
- 실험의 모든 파라미터 추적
- 다른 설정들을 쉽게 실험할 수 있음
- 개별 실행의 설정들을 데이터베이스에 저장
- 결과를 재생성
Sacred의 주요 메커니즘
- ConfigScopes: 함수의 local 변수를 편리하게 다룰 수 있음,
@ex.config데코레이터 사용 - Config Injection: 설정 함수의 모든 파라미터에 접근 가능
- Command-line interface: 파라미터들을 변경하거나 다른 변형을 실행하는데 파워풀한 커맨드라인 인터페이스를 획득 가능
- Observers: 실험의 모든 정보들, 의존성, 사용하는 설정, 실행한 기기, 과정 결과를 기록하여 Observer에 제공, Mongo DB에 저장
- Automatic seeding: 실험에서 무작위로 제어하는 것을 도와줌
Hello World
@ex.automain데코레이트ex.automain(my_main()) 같은 의미
@ex.main대신@ex.automain을 사용하는 것을 추천파일을 실행하면 실험을 자동으로 실행 해줌
@ex.automain이 작동 하려면 파일의 끝에 함수가 있어야 함, 그렇지 않으면 실험에 포함되지 않음from sacred import Experiment # create experiment instance ex = Experiment() # decorate @ex.automain def my_main(): print("Hello world")출력결과

First Configuration
first_config.py로 작성
설정:
@ex.config데코레이터 추가config함수 내에서 message변수 추가
main함수에서 "Hello world"대신 message 파라미터 추가
from sacred import Experiment
ex = Experiment('hello_config')
@ex.config
def my_config():recipient = "world" message = "Hello %s!" % recipient@ex.automain
def my_main(message):print(message)
실행 결과
실험 이름 지정: Experiment('실험이름')
실행 인자와 같이 실행하는 경우 실행할 때마다 seed값 변경
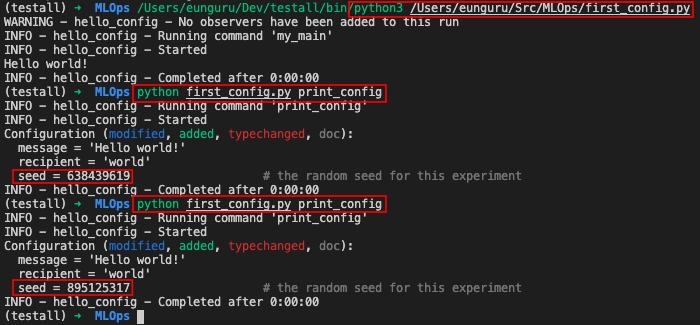
Command-Line 인터페이스를 이용한 configuration 업데이트
with config=update형식으로 입력하여 실행- 해당 config가 지속되지 않음

- 해당 config가 지속되지 않음
Experiment 실행
- 실행방법
@ex.automain사용- 파이썬에서 직접 실행: run함수 호출
- first_config.py에서 Experiment 생성
- first_config.py를 가져옴
- run()함수 호출하여 실행
- run()함수 호출 시
config_updates로 config값 조정 가능 - JSON 직렬화(숫자, 문자열, 리스트, 튜플, 사전) 가능한 변수로 지정
- run()함수 호출 시

- jupyter notebook에서 실행하기 위해서는
- Experimnet 객체 생성 시
interactive=True로 파라미터 전달 필요 @ex.main대신@ex.automain사용
- Experimnet 객체 생성 시
Caputure 함수
Capture 함수에서 config 함수의 모든 설정 값들을 파라미터로 접근 가능
Capture 함수를 호출할 때마다 누락된 파라미터를 자동으로 채우려고 시도함
Config함수에서 지정한 파라미터가 기본 파라미터 보다 우선시 됨
  from sacred import Experiment

  ex = Experiment()

  @ex.config
  def my_config():
      foo = 42
      bar = 'baz'

  @ex.capture
  def some_function(a, foo, bar=10):
      print("a={}, foo={}, bar={}".format(a, foo, bar))

  @ex.automain
  def my_main():
      some_function(1, 2, 3)
      some_function(1)
      some_function(1, bar=12)
      some_function()             # error
결과

Experiment 관찰하기
수집하는 정보들
- 시간: 시작 시간, 정지 시간
- 사용된 설정
- 결과나 발생한 에러
- 실행되는 머신들의 정보
- 실험에 의존성이 있는 패키지와 버전
ex.open_resource로 열려진 파일들ex.add_artifact로 추가된 파일들
Observer 인터페이스를 사용하여 정보들에 접근
Observer 종류
Mongo Observer: MongoDB에 모든 저장File Storage Observer: 로컬파일로 저장TinyDB ObserverSQL ObserverS3 ObserverQueue Observer
MongoObserverSacred에서 사용하는 observer들 중에 하나
MongoDB에 연결하고 수집된 모든 정보들을 문서에 저장
MongoObserver코드를 통해 추가from sacred.observers import MongoObserver ex.observers.append(MongoObserver())MongoObserver커맨드라인, 플래그를 통해 추가python 파일명 -m HOST:PORT:DB이름테스트 소스
  from sacred import Experiment
  from sacred.observers import MongoObserver

  ex = Experiment('hello_config')
  ex.observers.append(MongoObserver(url='localhost:27017',
                                  db_name='MY_DB'))

  @ex.config
  def my_config():
      recipient = "world"
      message = "Hello %s!" % recipient

  @ex.automain
  def my_main(message):
      print(message)
MongoDB 저장 결과

File Storage Observer데이터베이스 설정이 어렵거나 불가능한 예비 실험 및 사례를 위한 것
FileStorageObserver코드를 통해 추가from sacred.observers import FileStorageObserver ex.observers.append(FileStorageObserver.create('my_runs'))FileStorageObserver커맨드라인, 플래그를 통해 추가python 파일명 -F BASEDIR python 파일명 --file_storage=BASEDIR테스트 소스코드
  from sacred import Experiment
  from sacred.observers import FileStorageObserver

  ex = Experiment('hello config')
  ex.observers.append(FileStorageObserver.create('my_runs'))

  @ex.config
  def my_config():
      recipient = "world"
      message = "Hello %s!" % recipient

  @ex.automain
  def my_main(message):
      print(message)
실행결과 및 생성 디렉토리 구조

실행할 때마다 몇개의 서브 디렉토리를 생성, 내부에 파일 생성
config.json: 설정 값 포함count.txt: 캡쳐 아웃풋 포함run.json: 주요정보들 저장
My Commands
@ex.command데코레이터를 이용해서 추가적인 커맨드 추가 가능from sacred import Experiment ex = Experiment("my_commands") @ex.config def cfg(): name = "John" @ex.command def greet(name): print("Hello {}! Nice to greet you!".format(name)) @ex.command def shout(): print("WHAZZZUUUUUUUUUUP!!!???") @ex.automain def main(): print("This is just the main command. Try greet or shout.")s실행결과
추가적인 command option들은
python [파일명] help를 통해 알 수 있음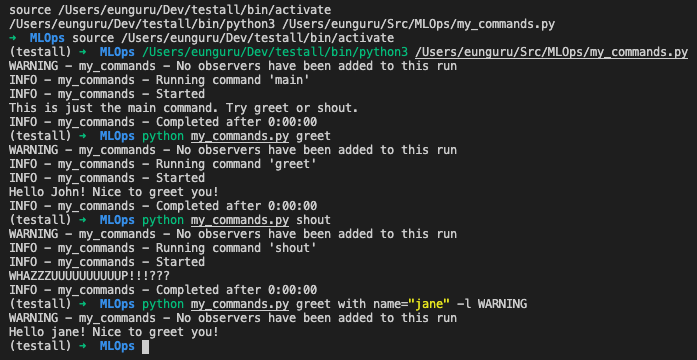
주요 Flag
Logging Levels: logging level 제어
입력방법
-l LEVEL—loglevel=LEVEL
logging level(Level:Numeric value)
- CRITICAL: 50
- ERROR: 40
- WARNING: 30
- INFO: 20
- DEBUG: 10
- NOTSET: 0
예시화면
MongoDB Observer: MongoDB observer 추가
- 입력방법
-m DB—mongo_db=DB
- DB의 형태는
[host:port:]db_name[.collection][!priority]여야 함
- 입력방법
FileStorage Observer: filestorage observer 추가
- 입력방법
- -F BASEDIR
- —file_storage=BASEDIR
- 입력방법
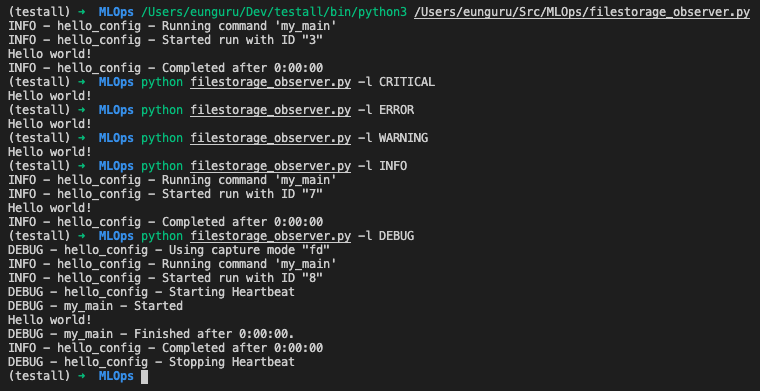
Capturing stdout/stderr
- Sacred는 observer에 모든 출력결과를 캡쳐하고 전송(설정으로 변경)
- 설정 모드는 커맨드라인으로 셋팅 가능:
no,sys,fdno: 출력결과를 캡쳐하지 않음, 실험에 observer를 추가하지 않음sys: sys.stdout과 sys.stderr로 쓰여진 모든 출력결과를 캡쳐 (Windows 기본 설정)fd: 파일 디스크립터 레벨에서 출력결과를 캡쳐, 프로그램, 자식 프로세스들의 출력결과를 포함 (Linux, OSX 기본설정)
- 설정 모드는 커맨드라인으로 셋팅 가능:
Metrics API
- 실험을 하는 동안 다양한 값들(예: 학습과정 중 accuracy)을 측정하기 위한 API
- Metrics API를 통해 숫자 값(예: int, float) 트랙킹을 지원
- 실험에서 API에 접근하기 위해 현재 실험에서 변수들이 참조 가능한 범위여야 함
run.log_scala(metric_name, value, step)메소드는 metric 이름을 가져야 하고 반복되는 스텝동안 값들을 주어진 값들을 측정- 스텝을 미 지정 시 각 metric은 자동적으로 1씩 증가하도록 설정 됨
- 현재는 MongoObserver(metrics collection에 저장), FileStorageObserver(metrics.json)에 의해 수집 가능
예제: Iris Classification 소스코드
Sacred 적용 전
  import pandas as pd
  from sklearn.model_selection import train_test_split
  from sklearn import svm, metrics

  C = 1.0
  gamma = 0.7
  kernel = 'rbf'

  data_url = 'https://github.com/pandas-dev/pandas/raw/master/pandas/tests/data/iris.csv'
  iris_df = pd.read_csv(data_url)
  print("iris_df.shape: {}".format(iris_df.shape))

  iris_data = iris_df[['SepalLength', 'SepalWidth', 'PetalLength', 'PetalWidth']]
  iris_target = iris_df['Name']

  data = iris_data.values
  target = iris_target.values

  X_train, X_test, y_train, y_test = train_test_split(data,
                                                      target,
                                                      test_size = 1/3,
                                                      random_state=0)

  print("X_train.shape: {}, X_test.shape: {}".format(X_train.shape,
                                                      X_test.shape))
  print("y_train.shape: {}, y_train.shape: {}".format(y_train.shape,
                                                      y_test.shape))

  clf = svm.SVC(C, kernel, gamma=gamma)
  clf.fit(X_train, y_train)

  y_pred = clf.predict(X_test)
  print("predict: {}".format(y_pred))

  accuracy = metrics.accuracy_score(y_test, y_pred);
  print("accuracy: {}".format(accuracy))
Sacred 적용 후
소스코드
  import pandas as pd
  from sklearn.model_selection import train_test_split
  from sklearn import svm, metrics
  from sacred import Experiment
  from sacred.observers import FileStorageObserver

  ex = Experiment('iris_rbf_svm')
  ex.observers.append(FileStorageObserver.create('example/my_runs'))

  @ex.config
  def cfg():
      C = 1.0
      gamma = 0.7
      kernel = "rbf"

  @ex.capture
  def get_model(C, gamma, kernel):
      return svm.SVC(C, kernel, gamma=gamma)

  @ex.automain
  def run():
      data_url = 'https://github.com/pandas-dev/pandas/raw/master/pandas/tests/data/iris.csv'
      iris_df = pd.read_csv(data_url)
      print("iris_df.shape: {}".format(iris_df.shape))

      iris_data = iris_df[['SepalLength', 'SepalWidth', 'PetalLength', 'PetalWidth']]
      iris_target = iris_df['Name']

      data = iris_data.values
      target = iris_target.values

      # train data, test data split
      X_train, X_test, y_train, y_test = train_test_split(data,
                                                          target,
                                                          test_size = 1/3,
                                                          random_state=0)

      print("X_train.shape: {}, X_test.shape: {}".format(X_train.shape,
                                                          X_test.shape))
      print("y_train.shape: {}, y_train.shape: {}".format(y_train.shape,
                                                          y_test.shape))
      clf = get_model()
      clf.fit(X_train, y_train)

      y_pred = clf.predict(X_test)
      #print("predict: {}".format(y_pred))

      accuracy = metrics.accuracy_score(y_test, y_pred);
      print("accuracy: {}".format(accuracy))
실행결과

참고사이트
'AI&BigData > MLOps' 카테고리의 다른 글
| AutoML 도구 Microsoft NNI (0) | 2020.03.02 |
|---|---|
| 머신러닝 실험관리 도구 Sacred를 위한 웹 대시보드 Omniboard (0) | 2020.03.01 |